COREtec Pro Plus Belmont Hickory 7"
Engineered toughness to stand up to commercial and high-traffic residential settings, with a denser, more rigid SPC core.
-
Extra scratch and impact resistance withstands heavy use
-
Rigid core features special top and bottom layers for stability
-
Backed by a limited 15 year heavy commercial warranty


Layers
-
UV Acrylic Finish
Durable: Provides superior stain resistance and cleanability.
-
Wear Layer
Maintenance Free: Protects against excessive wear and stains. Never needs sanding, sealing or refinishing.
-
Luxury Vinyl Design Layer
Looks: COREtec offers the widest selection of designs.
Textures: Detailed embossing and beveling.
-
Super-Dense SPC (Solid Polymer Core)
100% Waterproof: Won’t warp or buckle.
Easy to Install: Angle tap system can be installed easily over existing floors.
Dent Resistant: offers commercial-grade impact resistance that is perfect for high-traffic areas at home or offices.
-
Balancing Layers
Provide extra stability.
-
Attached Cork Underlayment
Quiet & Warm: Natural cork underlayment blocks out chills and noise.
I. General Information
All instructions and recommendations should be followed for a satisfactory installation.
-
Acclimation of material prior to installation is not required, however, the floor covering should be installed in a climate controlled environment with an ambient temperature range between 55° - 85°F (13°-29°C) or average temperature of 70°F (21.1°C).
-
For installations involving 3 season scenarios, meaning, the dwelling or installed space is without climate control for extended periods during certain seasons of the year, the post installation temperature range allowed is an ambient room temperature between -25°F and 155°F (31.6°- 68.3°C). This allowance is for floating floors only and does not apply to glue-down installations.
-
Avoid exposure to direct sunlight for prolonged periods, doing so may result in discoloration. During peak sunlight hours, the use of drapes or blinds is recommended. Excess temperature due to direct sunlight can result in thermal expansion and UV fading.
-
Install product after all other trades have completed work that could damage the flooring.
-
If cabinets are to be installed on top of the flooring (including islands), that area of material must be fully adhered to the subfloor (including an additional 2’ft beyond the cabinets and islands).
-
-
To minimize shade variation, mix and install planks from several cartons.
-
Inspect all planks for damage before installing. If you have any concerns about the product fit or finish, call Shaw Information Services at 1-800-441-7429. Claims will not be accepted for flooring that has been cut to size and/or installed.
-
Use cementitious patching and leveling compounds that meet or exceed maximum moisture level and pH requirements. Use of gypsum-based patching and/or leveling compounds which contain Portland or high alumina cement and meet or exceed the compressive strength of 3,000 psi are acceptable.
-
Installation Methods: Floating (on, above or below grade) / Glue Down (on, above or below grade)
-
Required perimeter expansion spacing for Floating or Glue Down installation is as follows:
For areas less than 2500 sq ft, use 1/4" gap
For areas larger than 2500 sq ft. use 1/2" gap. -
This flooring is waterproof and reliably secures the flooring panels on all four sides. However, excessive moisture in the subfloor could promote mold, mildew, and other moisture related issues like the trapping of moisture emissions under the flooring, which may contribute to an unhealthy indoor environment.
-
It is up to the flooring contractor to determine if a subfloor is not cured. Should the subfloor not be cured, a moisture barrier/mitigator like 6 mil poly should be considered for a successful installation and to prevent the material from being damaged by (moisture) vapor from the subfloor.
-
Additional layer of 6 mil poly film or equal vapor retarder with a perm rating of .1 or less may be used as an additional layer of protection.
- A second underlayment is allowed under any currently sold resilient product with attached underlayment in a residential application. If installed over a second underlayment, this underlayment cannot be greater than 3 mm thick. IIC (ASTM E492-09) and STC (ASTM E90-09) lab testing on certain resilient products tested with and without a second layer of underlayment, to date, does not indicate that a second underlayment will provide additional acoustic benefit.
- Crumb rubber underlayments are not an acceptable option for use with resilient floor coverings due to performance issues resulting from chemical incompatibilities.
II. Subfloor Information
All subfloors must be clean, flat, dry and structurally sound. The correct preparation of the subfloor is a major part of a successful installation. Subfloor must be flat – 3/16" in 10' or 1/8" in 6'.
A. Wood Subfloors
Do not install material over wood subfloors that lay directly on concrete or over dimensional lumber or plywood used over concrete.
Refer to ASTM F1482 for panel underlayment recommendations.
-
Do not apply sheet plastic over wood subfloors.
-
Basements and crawl spaces must be dry. Use of a 6 mil black polyethylene is required to cover 100% of the crawl space earth. Crawl space clearance from ground to underside of joist is to be no less than 18” and perimeter vent spacing should be equal to 1.5% of the total square footage of the crawl space area to provide cross ventilation. Where necessary, local regulations prevail.
-
DO NOT install over sleeper construction subfloors or wood subfloors applied directly over concrete.
-
All other subfloors - Plywood, OSB, particleboard, chipboard, wafer board, etc. must be structurally sound and must be installed following their manufacturer’s recommendations. Local building codes may only establish minimum requirements of the flooring system and may not provide adequate rigidity and support for proper installation and performance. If needed add an additional layer of APA rated underlayment, fasten and secure according to the underlayment manufacturer’s recommendations.
-
Resilient flooring is not recommended directly over fire-retardant treated plywood or preservative treated plywood. An additional layer of APA rated 1/4" thick underlayment should be installed.
B. Concrete Subfloors
NEW AND EXISTING CONCRETE SUBFLOORS SHOULD MEET THE GUIDELINES OF THE LATEST EDITION OF ACI 302 AND ASTM F 710, “STANDARD PRACTICE FOR PREPARING CONCRETE FLOORS TO RECEIVE RESILIENT FLOORING” AVAILABLE FROM THE AMERICAN SOCIETY FOR TESTING AND MATERIALS, 100 BARR HARBOR DRIVE, WEST CONSHOHOCKEN, PA 19428; 610-832-9585; HTTP://WWW.ASTM.ORG.
-
Floors shall be smooth, permanently dry, clean, and free all foreign material such as dust, wax, solvents, paint, grease, oils, and old adhesive residue. The surface must be hard and dense, and free from powder or flaking.
-
If the adhesive residue is asphalt‐based (cut‐back), or any other type of adhesive is present, it must be removed by industry accepted methods such as mechanical removal or wet scraping.
-
If a chemical abatement has been performed, use Shaw Surface Prep EXT to remove any residual chemicals present. Once Shaw Surface Prep EXT has been properly cleaned and removed, apply one coat of Shaw MRP for additional protection.
-
Adhesive removal through the use of solvents or citrus adhesive removers is not recommended. Solvent residue left in or on the subfloor may affect the new adhesive and floor covering.
WARNING! DO NOT SAND, DRY SWEEP, DRY SCRAPE, DRILL, SAW, BEAD BLAST ORMECHANICALLY CHIP OR PULVERISE EXISTING RESILIENT FLOORING, BACKING, LINING FELT , ASPHALTIC “ CUT BACK” ADHESIVES OR OTHER ADHESIVES.
These products may contain either asbestos fibers and/or crystalline silica. Avoid creating dust. Inhalation of such dust is a cancer and respiratory tract hazard. Smoking by individuals exposed to asbestos fibers greatly increases the risk of serious bodily harm. Unless positively certain that the product is a non‐asbestos‐containing material, you must presume it contains asbestos. Regulations may require that the material be tested to determine asbestos content and may govern the removal and disposal of material. See current edition of the Resilient Floor Covering Institute (RFCI) publication Recommended Work Practices for Removal of Resilient Floor Coverings for detailed information and instructions on removing all resilient covering structures. For current information go to www.rfci.com.
-
Concrete slabs must be dry with no visible moisture.
-
Required Moisture Testing - maximum moisture level per ASTM 1869 CaCl is 8 lbs. and ASTM 2170 In-situ Relative Humidity 90% per 1000 sq.ft. in 24 hours.
-
Do not install over concrete with a history of high moisture or hydrostatic conditions. Excessive moisture in the subfloor could promote mold, mildew, and other moisture related issues like the trapping of moisture emissions under the flooring, which may contribute to an unhealthy indoor environment. Shaw Industries does not warrant nor is responsible for damage to floor covering due to moisture related issues.
-
pH level of concrete should be between 7-10.
-
The final responsibility for determining if the concrete is dry enough for installation of the flooring lies with the floor covering installer.
NOTE: IT MAY NOT BE THE FLOOR COVERING INSTALLER'S RESPONSIBILITY TO CONDUCT THESE TESTS. IT IS, HOWEVER, THE FLOOR COVERING INSTALLER'S RESPONSIBILITY TO MAKE SURE THESE TESTS HAVE BEEN CONDUCTED, AND THAT THE RESULTS ARE ACCEPTABLE PRIOR TO INSTALLING THE FLOOR COVERING. WHEN MOISTURE TESTS ARE CONDUCTED, IT INDICATES THE CONDITIONS ONLY AT THE TIME OF THE TEST.
Lightweight Concrete
All recommendations and guarantees as to the suitability and performance of lightweight concrete under resilient flooring are the responsibility of the lightweight concrete manufacturer. The installer of the lightweight product may be required to be authorized or certified by the manufacturer. Correct on-site mixing ratios and properly functioning pumping equipment are critical. To ensure proper mixture, slump testing is recommended.
-
Lightweight aggregate concretes having dry densities greater than 90 lbs. per cubic foot may be acceptable under resilient flooring.
-
Concrete slabs with heavy static and/or dynamic loads should be designed with higher strengths and densities to support such loads.
-
Surface must be permanently dry, clean, smooth, free of all dust, and structurally sound.
-
Perform Bond testing to determine compatibility of adhesive to the substrate. Shaw 9050 primer can be utilized to promote adhesion.
-
Three internal relative humidity tests should be conducted for areas up to 1000 SF. One additional test, for each additional 1000 SF.
Radiant Heating: Radiant-heated subfloor systems can be concrete, wood or a combination of both.
The heating systems components must have a minimum of 1/2" separation from the flooring product. The system must be on and operational for at least 2 weeks prior to installation to reduce residual moisture. Three days prior to installation lower the temperature to 65 degrees, after installation gradually increase the temperature in increments of 5° F to avoid overheating. Maximum operating temperature should never exceed 85°F. Use of an in-floor temperature sensor is recommended to avoid overheating. Contact the manufacturer of your radiant heating system for further recommendations.
- Electric Radiant Floors: consist of electric cables (or) mats of electrically conductive materials mounted on the subfloor below the floor covering. Mesh systems are typically embedded in thin-set. When embedding the system components, use cementitious patching and leveling compounds that meet or exceed Shaw’s maximum moisture level and pH requirements. Use of gypsum-based patching and/or leveling compounds which contain Portland or high alumina cement and meet or exceed the compressive strength of 3,000 psi are acceptable.
- Hydronic Radiant Floors: pump heated water from a boiler through tubing laid in a pattern under the flooring. Typically installed in channels under a wooden subfloor (or) imbedded in concrete slabs.
C. Existing Floor Coverings
Flooring can be installed over most existing hard-surface floor coverings, provided that the existing floor surface is fully adhered, clean, flat dry structurally sound and free of deflection.
-
Existing sheet vinyl floors should not be heavily cushioned and not exceed more than one layer in thickness. Soft underlayment and soft substrates will compromise the product's locking ability as well as diminish its indentation resistance.
-
Installation is NOT allowed over any type of carpet.
-
Do NOT install over wood floors adhered to concrete.
- This product can be installed over existing ceramic/porcelain tile products with up to a 1/4 inch wide grout joint. If the grout joint width exceeds 1/4 inch, a cementitious patching compound should be used to fill the grout joint to make it smooth with the surface of the tile.
-
Raised access panels must be stable, level, flat, free and clean of existing adhesives
-
24" x 24" panels are recommended.
-
Lippage (variation of height) between of panels must not exceed 0.295” (0.75 mm)
-
Gaps between panels must not exceed 0.039” (1mm)
-
There should be no deflection of the individual panels – Concave less than 0.0295” (0.75 mm)
-
Flatness 1/8” in 10’
-
Stagger the flooring tiles/planks to overlap the access panels
-
Telegraphing of access panel seams may be visible and is not considered a product defect nor warranted by the flooring manufacturer.
If needed overlay the panels with a 1⁄4” (6 mm) plywood and properly fasten to the access panels prior to the installation of the floorcovering. Prior to underlayment installation, repair any loose or unstable panels. Use the appropriate installation methods for the product.
III. Installation
Tools: Tape Measure, Utility Knife, Jigsaw, Tapping Block or Rubber Mallet, Pull Bar, 1/4" Spacers, T-Square, Safety Glasses, Broom or Vacuum and, if necessary, tools for subfloor repair.
Installation of 6 mil Poly Film Underlayment is recommended for floating method only in high moisture applications.
For use over concrete substrates - seams MUST be taped.
Optional over wood substrates – do NOT tape seams.
-
Begin at the starting wall. Roll underlayment out parallel to the starting wall and allow the poly film to run 2 inches up the wall.
-
After the flooring has been installed trim back the poly film from the wall.
-
Roll the next course of poly film parallel to the first run and overalap a minimum of 4 inches. Smooth out any wrinkles or creases in the poly film. Use clear tape to tape the seams together when installed over concrete substrates.
- Continue to install the flooring over top of the poly film taking care not to damage the poly film.
Note: Do not cover the entire area of the substrate to prevent damage or present a slip hazard. Roll the poly film out one row at a time.
Floating Installation
SPC plank flooring is designed to be installed utilizing the floating method. Proper expansion space 1/4” (6.35 mm) is required. Undercut all doorjambs. Do not fasten wall moldings and or transition strips to the planks.
Glue Down Installation: SPC products are approved for glue down installation over approved wood and concrete substrates. Follow adhesive label application instructions. Install flooring into wet adhesive to achieve a permanent bond. Maintain 1/4” (6.35 mm) perimeter expansion space. Refer to adhesive label for moisture limits of the adhesive. Roll flooring immediately after installation with a 100 lbs. 3‐section roller
-
Recommended Adhesive(s): Shaw 200, 1500, 4100 (or equivalent/comparable adhesive).
-
If alternative adhesives are used, a bond test should be performed to ensure compatibility.
Tile patterns must be installed in a staggered (offset) brick pattern. Minimum 1/3 offset 1/2 offset is preferred.
LAYOUT
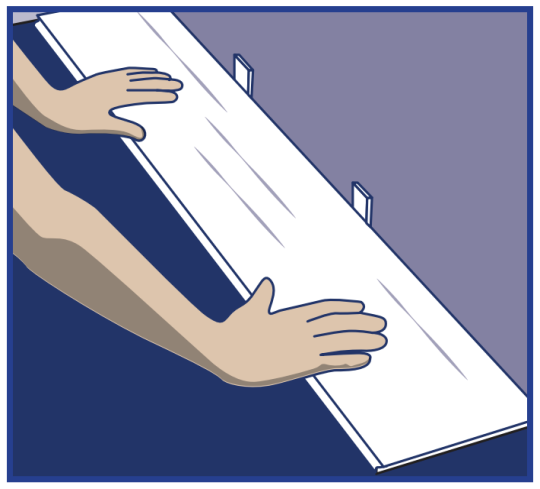
Step 1: Begin installation working from left to right. Insert spacers at ends and edges where planks meet wall. |
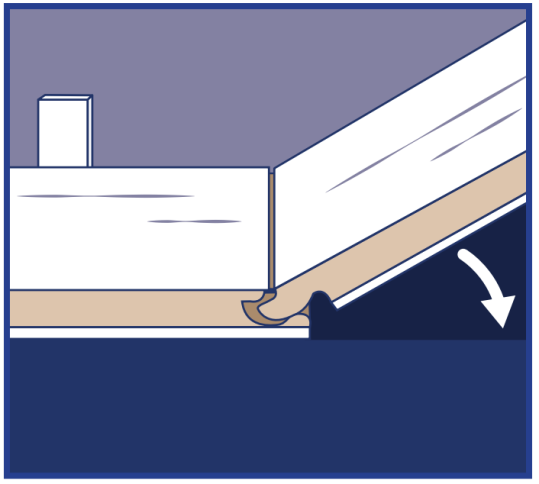
Step 2: Lock short end of plank by inserting tongue into groove at an angle and drop in place. Continue to end of first row. |
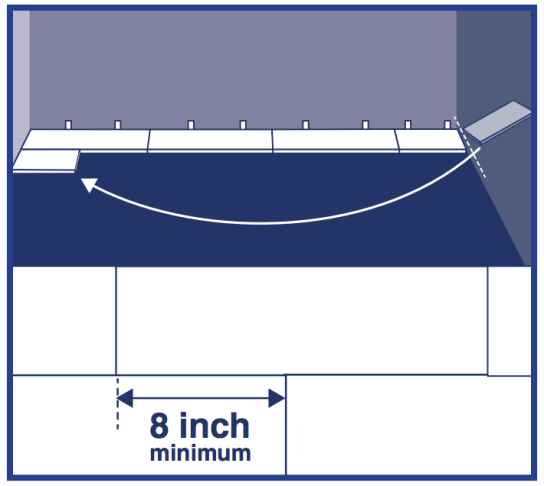
Step 3: Use leftover plank from first row as starter for second row. There must be at least 20cm between plank end joints on adjacent rows. FOR TILE INSTALLATIONS: The distance between end joints should be equal to 30cm for proper appearance. |
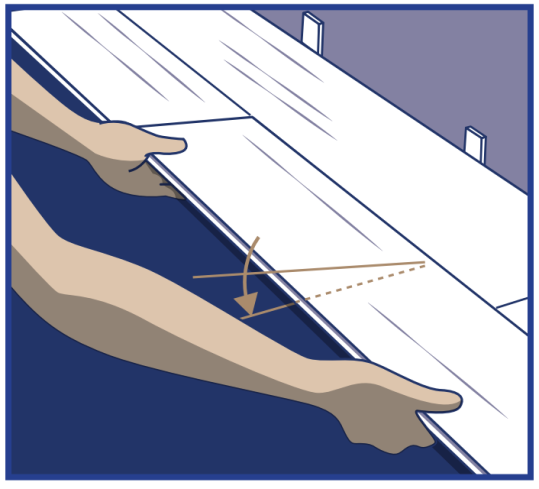
Step 4: Lock long edge of plank by inserting tongue into groove at an angle and drop in place. Slide plank toward end of previously installed plank until the tongue just touches the groove. |
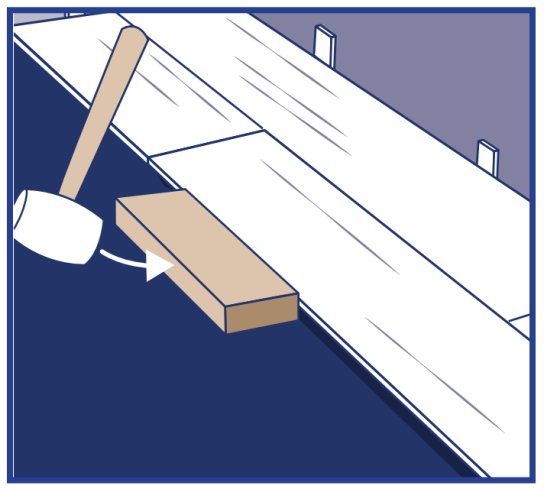
Step 5: IMPORTANT! Use hammer and tapping block to tap long edge of plank to ensure a tight fit. ANY GAPPING CAN COMPROMISE THE LOCKING SYSTEM! |
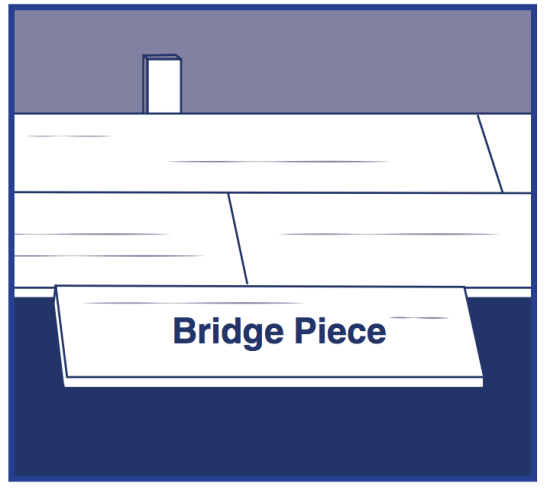
Step 6: Attach a scrap piece of floor to bridge the gap between ends of planks. |
|
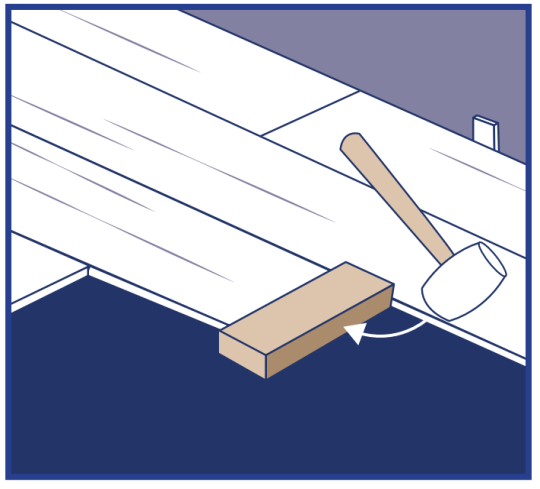
Step 7: Tap end of plank with hammer and tapping block to lock ends of planks together. Remove bridge and continue towards wall until installing the final plank in the row. BE SURE TO TAP ON EDGE OF VINYL SO AS NOT TO DAMAGE LOCKING PROFILE. |
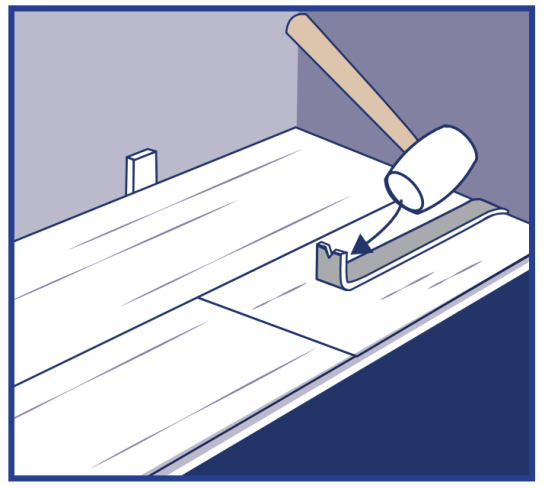
Step 8: Use hammer and pull bar to lock final piece in row. Insert spacer at end of row. Continue installation to final row.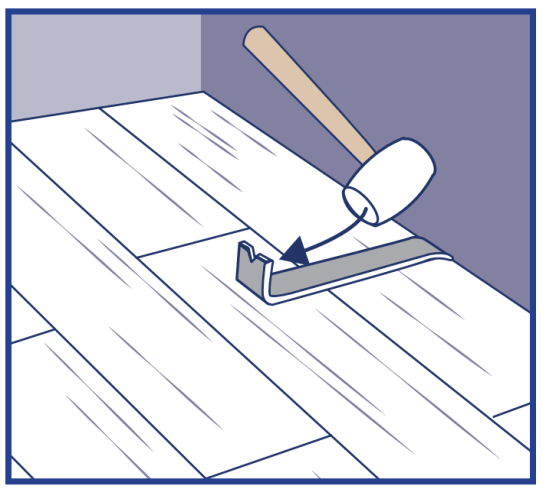
Step 9: Use hammer and pull bar to lock long edges of planks on final row. |
|
Installing underneath door jambs: |
|
|---|---|
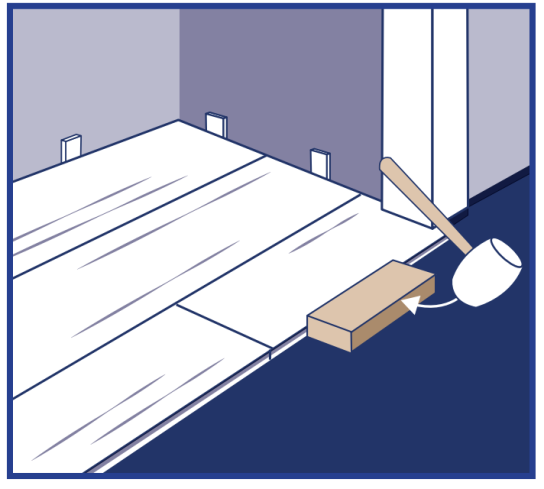
Step 1: Undercut space under door jamb to allow plank to slide freely. Tap long edge with hammer and tapping block to lock long edge. |
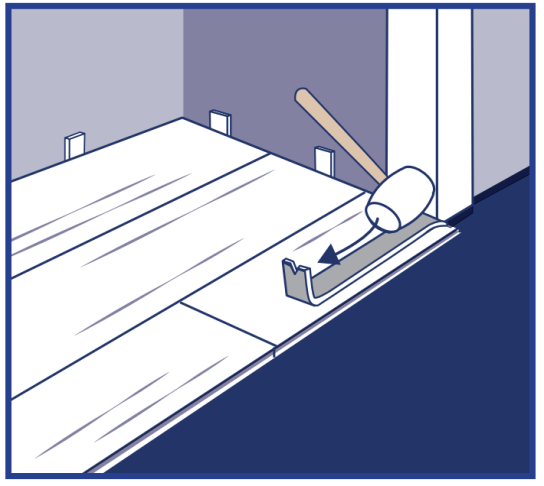
Step 2: Use hammer and pull bar to lock short end of plank. |
COMPLETION
-
Protect all exposed edges of the flooring by installing wall molding and/or transition strips. Make sure that no plank will be secured in any way to the subfloor.
-
For wet areas such as bathrooms caulk the perimeter of the floor with a flexible silicone caulk.
-
Protect the finished flooring from exposure to direct sunlight to reduce fading and thermal expansion.
-
Cutting resilient product into a fine point may lead to delamination. Use an ethyl cyanoacrylate based glue to help fuse the resilient point together. Be sure to clean all glue from the top surface immediately. Alcohol based glues may cause resilient products to swell.
-
Adhering tape to the surface of your resilient flooring could damage the surface.
Do not use tape to secure floor protection directly to the floor during construction or renovation. Instead, adhere tape to the material used to protect the floor and secure it to the base molding along the wall. A material such as ram board can also be used to protect your flooring.
Residential Resilient Waterproof Products lifetime Limited Warranty
Shaw Industries, Inc. (“the Company”) warrants its resilient waterproof flooring products under this Residential Limited Warranty when used in the proper fit for use indoor Residential applications with light to moderate foot traffic.
The warranty belongs to you, the original end-use purchaser, and begins when you purchase the resilient and extends for the limited warranty period stated above. The basis of any warranty related claim is the original “Company” invoice or authorized “Company” dealer.
The resilient waterproof flooring must be installed in accordance with the Company’s installation guidelines and specifications. The product must be maintained in accordance with the Company’s maintenance (resilient care) recommendations and such maintenance (resilient care) continues throughout the duration of the original installation. Damage resulting from a failure to follow installation and cleaning/maintenance guidelines will not be covered under this warranty.
Installation guidelines, specifications, and resilient care recommendations can be obtained from your dealer. For additional information, please see the bottom of this page.
Shaw products are not warranted against squeaking, popping or crackling. Some squeaking, popping, or crackling is possible when installed using floated methods.
What the Warranty Covers
-
Manufacturing Defects – The Company warrants that the floor plank or tile will be free from manufacturing defects during the period of this warranty. Manufacturing defects include delamination, core voids, thickness variation, and dimensional stability defects. Dimensional stability related defects are defined as dimensional changes in the width and/or length of the product greater than the tolerances as defined in ASTM F2199. Thickness variation is defined as thickness exceeding the thickness tolerance as defined in ASTM F386.
-
Wear – The vinyl layer of the floor plank is warranted not to wear through under normal residential use during the period of this warranty. Gloss reduction, scratches and dents in the finish are not considered surface wear and are not covered under the warranty. Wear through is defined as wear due to light to moderate foot traffic will not wear through to the pattern layer of the product.
-
Limited Lifetime Structural Warranty - Upon determination of a valid manufacturing defect, credit will be issued to the dealer and will be good toward the purchase of a replacement. When a defective product is installed, credit applies to material only and does not include labor since it is the responsibility of the installer to determine suitability of material prior to installation. Should a problem attributable to a manufacturing defect develop after flooring is installed, the cost of labor for repair will be covered by the Limited Lifetime Structure Warranty.
-
Limited Lifetime Petproof Warranty - The Company warrants that your luxury vinyl floor will resist staining caused by pet (domestic cat or dog) stains, including urine, feces, and vomit. Stain resistance means the ability of your floor to resist (i.e., minimize or withstand) permanent stains for as long as you own your floor. Cleaning of the affected area should begin immediately upon discovery. The more time that elapses before removal, the more difficult a stain will be to remove.
-
The Limited Petproof Warranty DOES NOT COVER: Any urine, feces, or vomit stains other than pet.
-
-
Limited Lifetime Waterproof Warranty – This warranty covers topical moisture as long as the water does not flow over the edge of the surface (edge of the room, cut boards, etc.). The Company warrants that for the lifetime of stated warranty period from the date of original purchase, your Shaw product will not swell, cup or crack due to:
-
Normal cleaning practices (see care and maintenance document for additional information)
-
Moisture due to everyday household spills (see care and maintenance document for additional information)
-
Normal moisture levels from subfloor when exposed to such conditions (see installation instructions document for additional information)
-
While moisture will not affect the product’s integrity, it is possible that, when excessive moisture accumulates in buildings, subfloors, or on building materials, mold (and/or) mildew growth can occur - particularly if the moisture problem remains undiscovered or unaddressed. In addition, such excessive moisture levels can cause the ends and/or sides of the product to lift/flare due to the vapor pressure from underneath. Such damage from excessive moisture levels (as outlined in the installation instructions document) are not covered by this warranty. All sources of subfloor moisture should be remedied prior to installation.
-
-
No Acclimation – The Company warrants the floor plank or tile can be installed without allowing the product to achieve room temperature as long as the building where product will be installed is acclimated and climate controlled as according to the installation guidelines.
What Conditions Apply
For jobsite and floor preparation conditions, see product specific installation guidelines. Any moisture related testing (i.e. relative humidity, pH, and calcium chloride) is not the responsibility of the Company and all issues related to subfloor moisture, including any product related issues, are excluded from this warranty. Chair floor protectors are recommended to inhibit premature wear of the surface of the resilient. Replacement resilient will come from current running-line products comparable to the warranted product.
Your warranty does not cover the following: damage caused by improper installation and/or maintenance; differences in color between products and samples or photographs; problems arising from excessive moisture, alkali or water pressure from the sub floor, floods, indentation from improper loading including heavy static loads, high heels, spiked shoes, rolling loads, chairs or other furniture not using floor protectors; cracking, warping, soiling, fading, improper maintenance or abuse caused by items such as roller skates and/or golf shoes; surface scratches, changes in shading, texture and/or gloss during use; damage caused by chemically reactive material, adhesive or tape, dye, mold, stains, spillage, burns, gouges, scratches, indentations, accidents, abuse or any harsh scouring pads while buffing; damage due to U.V. light and thermal heat sources or damage to floor caused by flooring that is installed using the floating method that subsequently is heated to temperatures above those specified in the product specific installation instructions.
What If You Need Warranty Service
You, the original purchaser, will contact your authorized Company dealer and/or Sales Representative for warranty or claim service. Please provide a valid proof of purchase and a detailed description of the issue, along with photographs showing the concern. Samples should be submitted for testing when available.
Dealers/Shaw Sales Representatives will file a claim via www.shawnow.com and submit the information you provided. A Shaw claims representative will thoroughly evaluate your claim.
Claims contact information: Shaw Industries Financial Services, PO Box 2128, Dalton, GA 30722 - 1-800-257-7429.
What We Will Do
Should a defect covered under this warranty be found, the affected area will be repaired to conform to the warranty. If repair is not commercially practical, the Company may, at its sole option, replace the affected resilient or refund the proportional purchase price for the affected area. The Company will pay the reasonable costs for freight and labor. Any costs incurred for the moving of equipment, furnishings, partitions and the like, that were installed over the commercial product, will be at the consumer’s expense.
NOTE: The warranty is not transferable. It extends only to the original end use purchaser. Shaw Industries Inc. does not grant to any person or entity the authority to create for it any obligation or liability in connection with this product. Shaw Industries Inc. shall not be liable to the consumer or any other person or entity for any incidental, special or consequential damages, arising out of breach of this limited warranty or any implied limited warranty (excluding merchantability).
All implied warranties, including an implied warranty of merchantability or fitness for a particular purpose, are hereby limited to the duration of this limited warranty. Some states do not allow the exclusion or limitation of implied warranties or the limitation of incidental or consequential damages, so the above limitations or exclusions may not apply to the purchaser. This warranty gives the purchaser specific legal rights, such rights may vary from State to State.
RESIDENTIAL RESILIENT MAINTENANCE
Proper care will help protect and maintain the appearance and performance of your resilient floor.
A Care Program Consists of Key Areas:
-
Post-Construction Maintenance
-
Preventative Maintenance
-
Routine Maintenance
-
Spot and Spill Removal.
For New Construction or Renovation: Construction dust and joint compound can be deposited on the flooring. If it is not completely removed and then wet mopped, it will create a haze on the surface of the flooring.
POST-CONSTRUCTION MAINTENANCE
-
Dry mop floor using a microfiber mop pad or appropriate floor vacuum to remove dust particulate from the floor.
-
Spray neutral pH cleaner, such as Encore, COREtec Cleaner or equivalent neutral pH floor cleaner, onto the floor in manageable areas (spray mist will dry quickly). Use a microfiber wet mop pad to mop the floor with cleaner. If pad becomes dirty, be sure to replace the pad with a new microfiber wet mop pad. Mop floor in sections.
-
Always rinse the floor with water only by mopping with water to remove any remaining residue from the floor.
In the event where dry wall dust/construction dust is mopped with water only, a residue film will appear on the floor after drying. Use the process below to remove the film from the floor.
PROCESS TO REMOVE CONSTRUCTION RESIDUE OR CLOUDY FILM FROM RESILIENT FLOORING
-
Dry mop floor to remove any construction dust or exterior soil tracked onto the flooring. Use microfiber dry mop pad. If microfiber dry mop pad gets dirty, replace pad with a clean pad.
-
Spray neutral pH cleaner, such as Encore, COREtec Floor Cleaner or equivalent neutral pH floor cleaner onto the floor in manageable areas (spray mist will dry quickly). Clean floor in sections. For smooth surface, use a low rpm (175 rpm) buffer with a 3M red pad on flooring with neutral pH cleaner applied to the floor to remove the residue film. (Never Dry Buff). For embossed or textured flooring, use a cylindrical brush scrubber, such as the Clark MA10 12E Scrubber and a neutral pH floor cleaner applied to the floor to remove the residue film.
-
Using a wet microfiber mop pad, rinse with water only to remove any remaining residue from the flooring. When wet mop pad becomes dirty, be sure to replace the pad with a new microfiber wet mop pad.
-
Repeat steps #2 and #3, if necessary.
When the resilient flooring is cleaned properly, the floor will have the same visual as right out of the box!
PREVENTATIVE MAINTENANCE
- Always protect floors when moving heavy objects to prevent permanent scratches and tears.
- Adhering tape to the surface of your resilient flooring could damage the surface.
Do not use tape to secure floor protection directly to the floor during construction or renovation. Instead, adhere tape to the material used to protect the floor and secure it to the base molding along the wall. A material such as ram board can also be used to protect your flooring. - Use appropriate wide floor protectors under tables, chairs, and any other heavy home furnishing to avoid permanent damage.
- Walk-off mats should be used at all entrances to absorb soil and moisture. If mats are placed directly on top of the resilient floors, use mats without latex or rubber backings to avoid possible discoloration.
- Use appropriate window coverings to avoid direct sunlight as this can fade the color of the flooring.
- Avoid using mop and shine products on your resilient flooring.
- Some disinfectants contain chemicals that can stain, discolor and cause general harm to your flooring product. Quaternary Ammonium Salts are among those that have been found to be harmful to your flooring when used over time. Take care to choose pH neutral products only.
ROUTINE MAINTENANCE
- Daily removal of dirt and dust is important to prevent particles from abrading the surface of resilient floors. Sweeping, dust mopping, and vacuuming are recommendations to remove soil particles that can result in scratches and worn appearances. Do not use vacuums with rotating beater bars on hard surfaces.
- Periodic wet cleaning will be necessary to help maintain the floor’s appearance. Always pre- vacuum or dust mop before any type of wet cleaning. Appropriate vinyl floor cleaning equipment and cleaning agents (neutral pH floor cleaners) are recommended. Do not use abrasive cleaners or cleaning agents that leave dull residues on the surface of the floors. Follow the cleaning manufacturer’s instructions for damp mopping and application. If rinsing is necessary, use clean water and expedite drying with air movers or fans.
- Encore, COREtec neutral pH floor cleaner or equivalent floor cleaner are recommended for general spotting and cleaning.
- Avoid using mop and shine products on your resilient flooring.
- Products containing bleach and steam mops are not recommended.
SPOT & SPILL REMOVAL
Our flooring products are engineered to resist and minimize common staining.
- Absorb wet spills as quickly as possible by blotting with paper or cloth towels. Rinse with water if necessary and blot dry.
- Dried spots should be removed by gentle agitation and rinsed with water. Blot dry.
- Use Encore, COREtec cleaning products or products formulated for vinyl floor cleaning. Do not use detergents or abrasive cleaners since these products can leave a dull residue.
- Use rubbing alcohol (isopropyl alcohol) with a clean white cloth for spots requiring a solvent type cleaner that water and cleaning agents cannot remove.
- Please note that some stain conditions may become permanent.
Safety Caution: The surfaces of resilient floors change during wet cleaning and finish applications. Use appropriate safety measures.


